
Picture-Perfect Pedi
rin
Published
05/24/2012
A couple of weeks ago, I was ecstatic to find our weather finally changing as the progression to summer months comes along. But it doesn't only mean tank tops and swimwear, but good tootsie etiquette!
Some were privy to my ''tootsie dance'' on cam in live chat (IX-NAY on the dubstep boobie dance!). But although harsh winter months can wreak havoc on the nails and skin, especially on feet, I always receive compliments from family, friends, and strangers alike on how my tootsies look so cute in the warmer months.
It really isn't too hard to achieve a great pedicure with a little bit of effort. Although it doesn't help when you have one or two friends with a foot fetish, it's important and fun to make your feet look great with an at-home pedi. Since this is a bi-weekly part of my warm weather life, and apparently I'm masterful at the ritual, read below as I share with you the steps involved in achieving a picture-perfect pedi. Get your piggies ready!
1. You can (really) skip the salon.
Last summer I actually went to a nearby nail salon to have my pedis done. Admittedly, it was due to sheer laziness. Although the Thai guys and gals did good work, honestly, besides the polishing, I could do a lot better on my own.
A nail shop can charge around $30-$40 for a pedicure, depending on whether you want standard or gel polish, massage, and nail details. But really, all it takes is a few tools and some cheap products to save yourself the time, money, and hassle of frequenting one of these places.
2. Clip and file.
A large nail clipper is best for use on durable toe nails. It doesn't matter if you make one snip across, or several smaller snips on angles. The purpose is to cut to the right length for you.
Likewise, it doesn't matter if the files you use are large, patterned, and expensive, are those 10-to-a-pack brown boards, or even a sturdy metal file. So long as they get the job done and are easy to handle, it's fine (I use a large, foam-center file, and don't like metal files).
You can file to either a squared or rounded shape, but either way, it's best to slightly edge the file underneath the nail to ensure any jagged edges and uneven lines are dealt with.
I personally don't like when people have length to their toe nails; I prefer mine to just barely end beneath the curve of the toe when looking downward. The toe itself is like a template I use - after clipping, I ensure each nail is filed into a nice, rounded shape that conforms to the curve of each toe. That way each nail is uniform to its match (i.e., each big toe matches, etc.).
3. Buff.
Use a buffing block or buff side of a file to make several swipes across the width of your nails. You may find that only the big toe nails actually need the buffing - since this step is to eliminate any deep ridges in the nail, or prevent peeling by smoothing any of the jagged edges you may have missed in filing. Be careful, though - only a few swipes should be necessary. Too much buffing will result in divets within the nail!
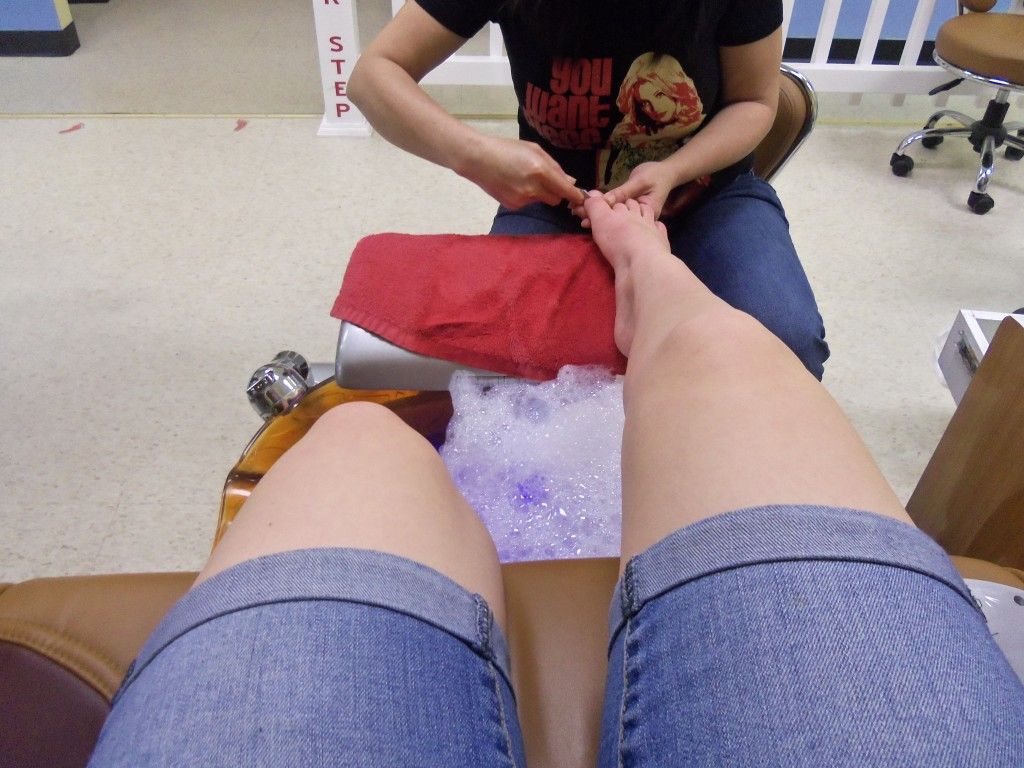
4. Soak.
A good time to prepare your soak would be during step 2. A reason we do the water step afterward would be due to the large amount of dust filing creates. Better to get it out of the way first, and use that time to prep the tub.
All you need is a few inches of water. Add some foot soaking salts or oil beads to a very warm running tap, and let it stand until you're ready. The salts and beads are not expensive, and can be bought at a beauty supply shop, Wal-Mart, or even a Dollar General. They're specifically made for pedis, and help to soften and condition the feet. Let your piggies soak for a few minutes.
5. Remove cuticle.
This is a lot better than it sounds. It's a really important step, but fear not - it doesn't even require cuticle nippers! Not even a cuticle stick. All you really need for this step are a few simple, household toothpicks.
Take the first foot and pat it dry with a towel. Then grab a toothpick, and use the pointed end to lightly scrape along the nail bed. Your softened cuticles should flake right off!
No pushing, shaping, nothing - it's as simple as that.
6. Pumice and scour.
At this point, for all intents and purposes, your nails themselves should be all done! Now we can focus on an equally important aspect of a good pedi - the feet themselves.
Your tools should consist of either a pumice stone or metal callus shaver. These also can be purchased at virtually any store for very cheap. Which one you use depends on the condition of the soles of your feet. Are they dry, tight, flaky, or practically blackened from dirt? Then the callus shaver is the way to go. If you've pedicured throughout the year, or have smooth, relatively healthy skin, then a pumice should be all you'd need.
Take a few minutes to scour your heels, soles, and sides of your feet, paying special attention to real rough areas. And make sure, like with step 5, you pat dry each foot before commencing, since these tools work best on dry feet.
Most callus shavers have a detachable compartment used for storing superfluous dead skin shavings, so make sure you check if it's ready to dump out before continuing. Not only does it help the life of the tool when kept clean, but you'd be surprised at how much dead skin doesn't get shedded from the feet.
WARNING!!! - Do not overdo it on this step. There are people out there who actually report sensitivity in walking after using callus shavers of all kinds. This is very bad. After all, the toughened skin on the bottom of the foot is designed to help protect us. The only purpose of this step is to remove the dead, dry, ashy, excess skin from problem areas. A few minutes with your tools should suffice.
7. Wash and moisturize.
With this step, it's time to clean up. Use a dime-sized drop of soap to wash your feet with a nail brush. If you don't have a nail brush, then a washcloth or pouf will do. If any dirt remains under your nails, use one of the toothpicks or a q-tip to carefully remove the debris.
Drain the tub, wash and put away your tools, pat your feet dry, and apply a generous amount of foot lotion. Like everything else mentioned, specialty foot lotions and creams are pretty cheap and can be purchased many places. Although normal body lotions will do. Make sure to massage it into your feet, especially into heels and in between toes. You can do something around the house while you let it soak in.
8. Polish!!
Now you're ready for the fun part, to polish and accessorize your piggies! First, be sure to use a bit of remover on a cotton pad to swipe over each toe nail. This will remove any excess oils, lotion, and residues that may remain.
Now one thing I absolutely cannot do for the life of me is apply polish correctly. Oftentimes I screw up and end up having to go over the big toes several times to get it right. But fortunately, there are a few remedies for this problem if it afflicts you:
- have a pedi party. -- Invite some friends over to do each other's polish.
It may be better if you have a different perspective
on the feet from the opposite direction.
- NOW go to a salon. -- If you don't want to risk any kind of mistakes after
all your hard work, now would be the time to go to a
nail shop. Like I mentioned, a full pedicure can go
for around $30-$40. But having a simple polish done?
$7-$9 tops.
- do what I do.
There is one way I can apply a great polish with absolutely no mistakes, even when preoccupied.
Little girl's glitter polish in mini-jars is foolproof and fun to apply. Basically all they are is top-coat
with some sparkle and a hint of color. Wal-Mart sells a line called bon-bons which work okay, but my personal favorite are the SallyGirl Mini Polish. The sparkly, tinted ones come in a bunch of colors, and they're an amazing 99 cents a piece.
I'm wearing the sparkly blue below. Along with some cute toe-rings and a daily moisturizing, all the steps above can equate to a picture-perfect pedi just like this!
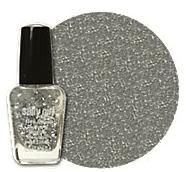
SallyGirl Mini Polish in Glitzy.
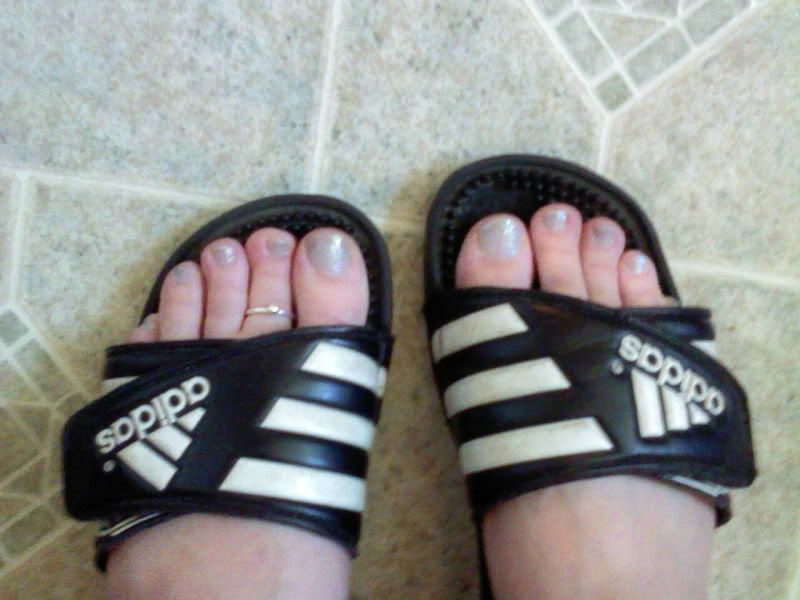
So Cute!!


4 Comments